If you've ever tried to figure out who actually showed up to a Google Meet call, you've probably discovered the same uncomfortable truth thousands of teachers, managers and event organizers run into every day: Google Meet does not give most users an attendance report.
The feature exists, but it's tucked behind specific paid Workspace plans, and even then it only fires for meetings that meet certain criteria. For everyone else, the meeting ends, the participant grid disappears, and there's no record of who joined, when, or for how long.
That gap matters. Schools need attendance for grading. Companies need it for compliance and payroll. Webinar hosts need it to follow up with engaged attendees.
This article covers four ways to get a Google Meet attendance report in 2026, including Google's native tracking, free Chrome extensions, manual workarounds, and form-based check-ins. By the end you'll know exactly which method fits your situation, what each one costs, and what each one actually captures.
What Is a Google Meet Attendance Report?
A Google Meet attendance report is a structured record of who attended a specific meeting and how long they were present. A good report goes well beyond a simple list of names.
It captures the participant's identity (name and email when available), the exact timestamp they joined, the timestamp they left, the total time they spent in the call, and ideally the join and leave events for participants who came and went multiple times. For recurring classes or standing meetings, a useful report also stitches together attendance across sessions so you can see patterns over time.
The most useful reports also surface derived metrics: attendance percentage relative to the meeting's total length, late detection, average time per participant, and a flag for participants who never showed up at all (when you have a known invite list to compare against). The difference between a raw participant log and a real report is the difference between data and insight.
Method 1: Google's Built-in Attendance Tracking
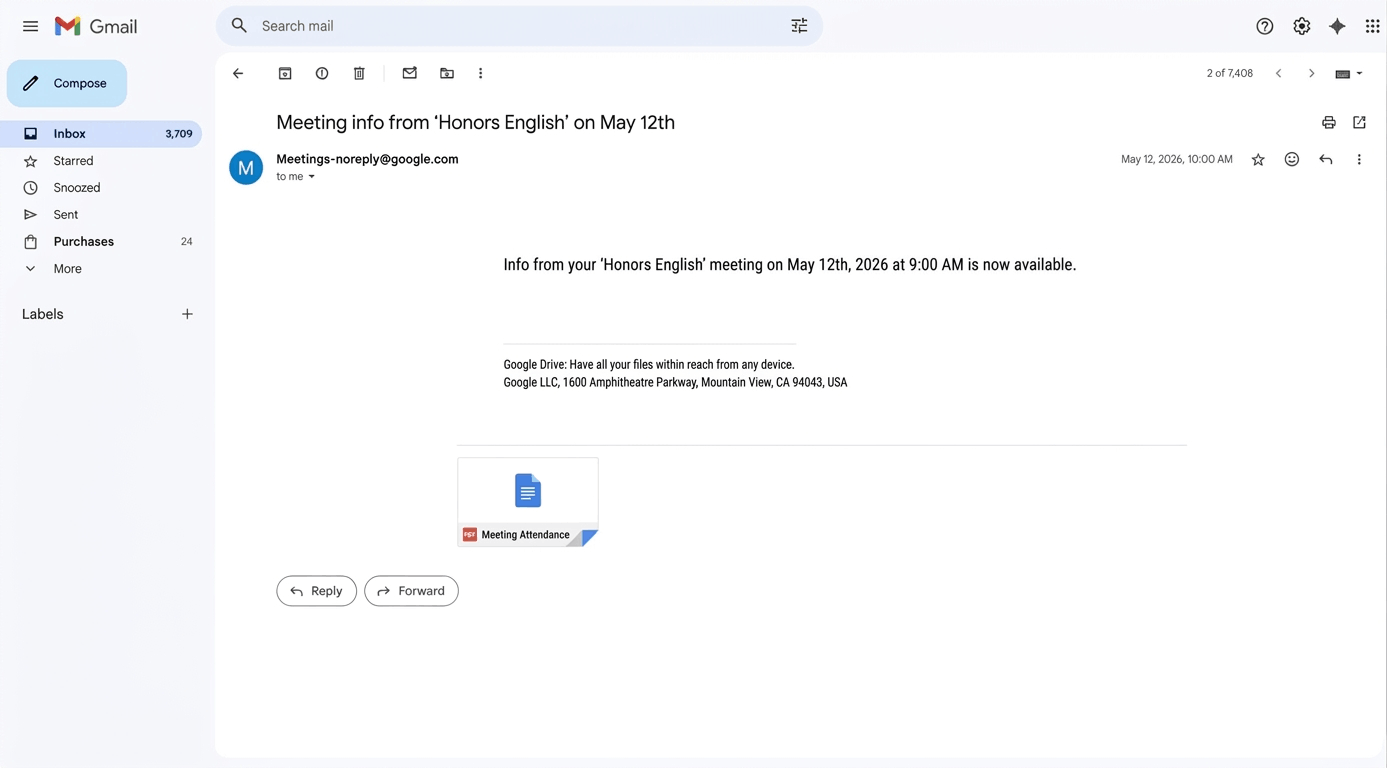
Google does ship a native attendance tracking feature, but it's only enabled on a narrow slice of Workspace plans. When it works, the host receives an email after the meeting with a CSV attachment listing each participant, their join time, leave time, and total duration in the call.
Who Can Use It
How to Enable It
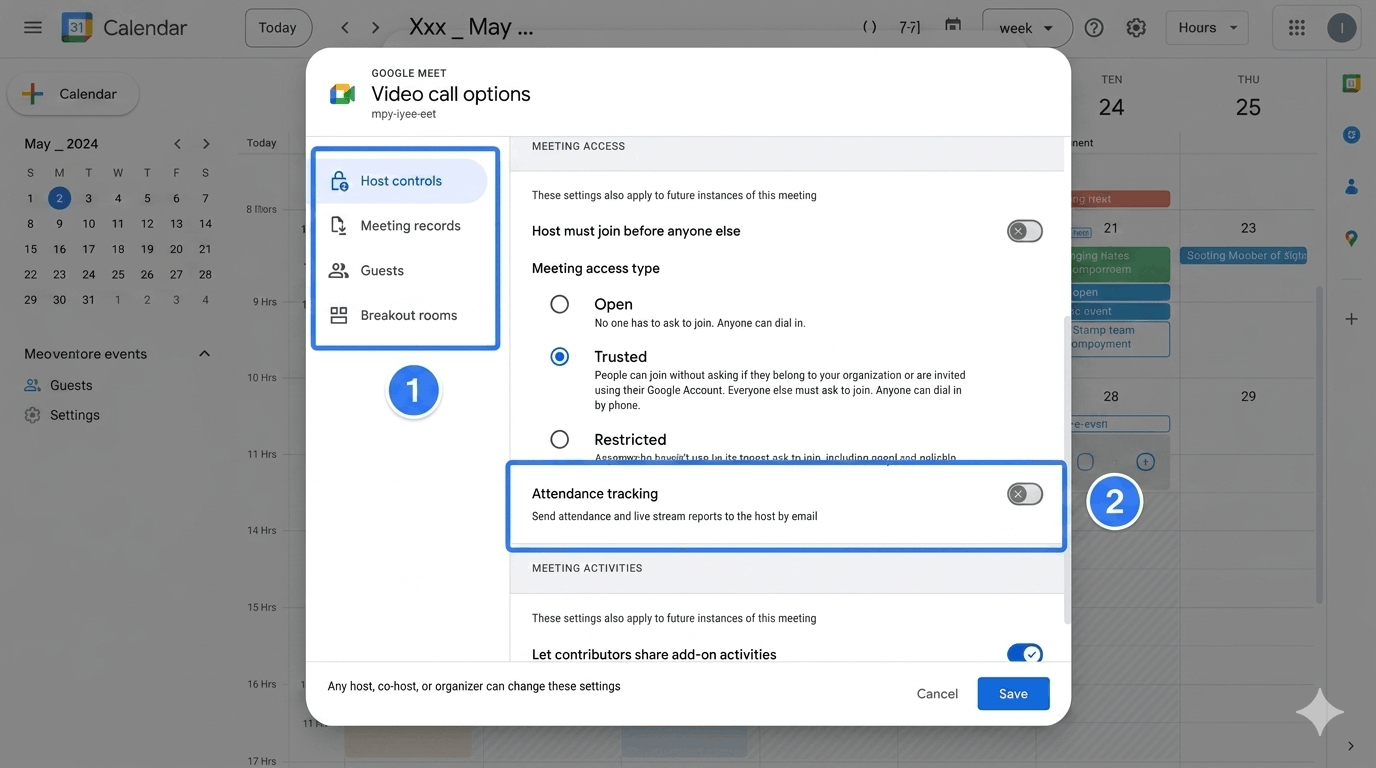
There are two places to turn it on. The cleanest path is from your calendar invite, because the setting sticks for the whole meeting from the moment people start joining.
From Google Calendar:
- Open the calendar event you want to track.
- Click the settings gear next to the Google Meet video conferencing block.
- Toggle on Attendance tracking.
- Save the event. The host will get a CSV report by email after the call ends.
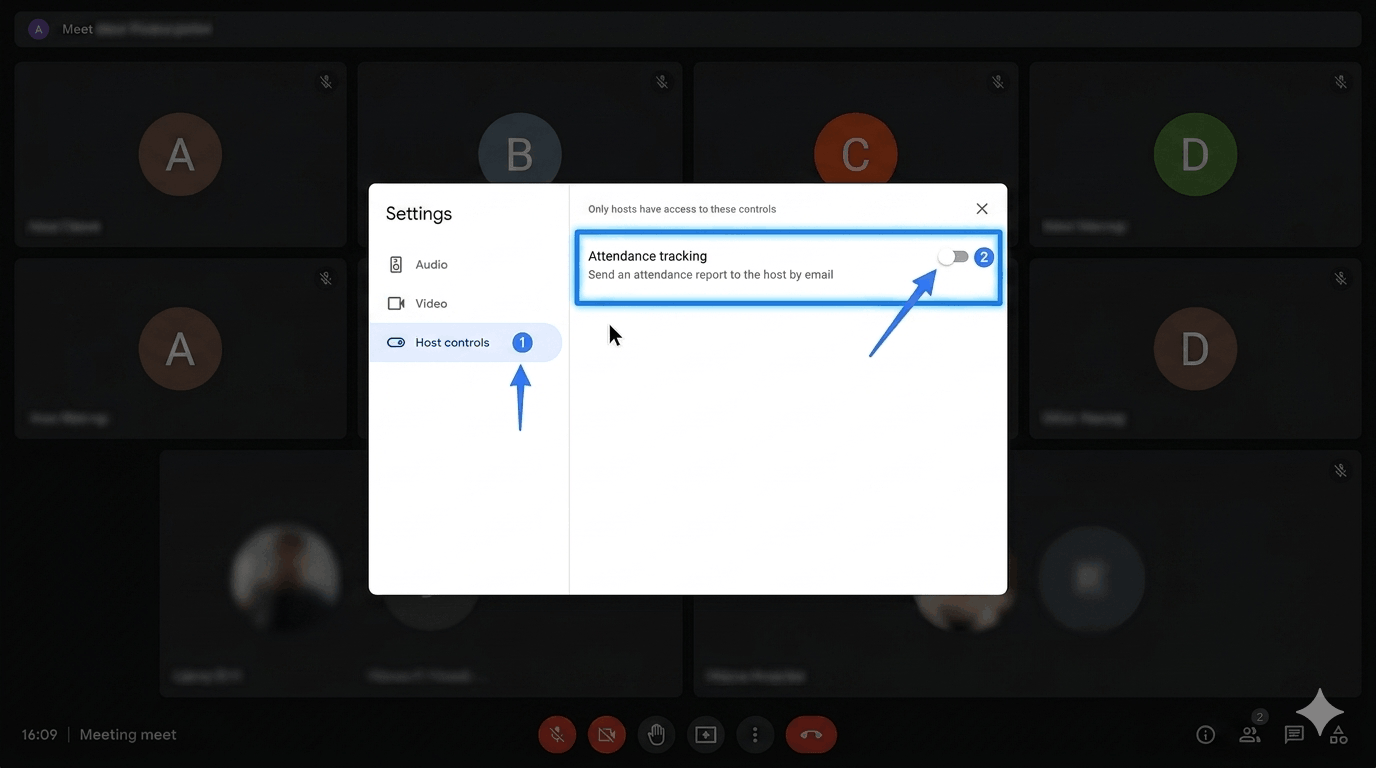
During an active meeting:
- Click the Host controls shield icon at the bottom right.
- Open the Meeting activities panel.
- Toggle on Attendance tracking.
- End the meeting. The report will be emailed once the meeting concludes.
What You Get
The report arrives in the host's inbox roughly 30 minutes after the meeting ends as a CSV attachment. It contains the participant's name, email (when available), the time they first joined, the time they left, and total time in the call.
For meetings under five participants or shorter than two minutes, Google does not generate a report at all.
Limitations of Google's Native Tracking
- Only available on Business Plus, Enterprise, Education Plus, and Teaching & Learning Upgrade plans.
- Free Gmail accounts are completely excluded, even for the host.
- Reports are only emailed; there is no dashboard or web view.
- No historical archive. If you delete the email, you lose the report.
- No combined view across recurring meetings or classes.
- No analytics, no late detection, no attendance percentages.
- Skipped entirely for meetings with fewer than 5 attendees or under 2 minutes.
- Cannot be exported as PDF without manual reformatting.
Method 2: Use a Chrome Extension (Free, Works with Any Account)
Chrome extensions read the participant grid directly from the Google Meet web client, which means they work for every account type including Gmail, Workspace Starter, Standard, and Education Fundamentals. They're the most popular alternative for users who can't justify upgrading to Business Plus just to get an attendance email.
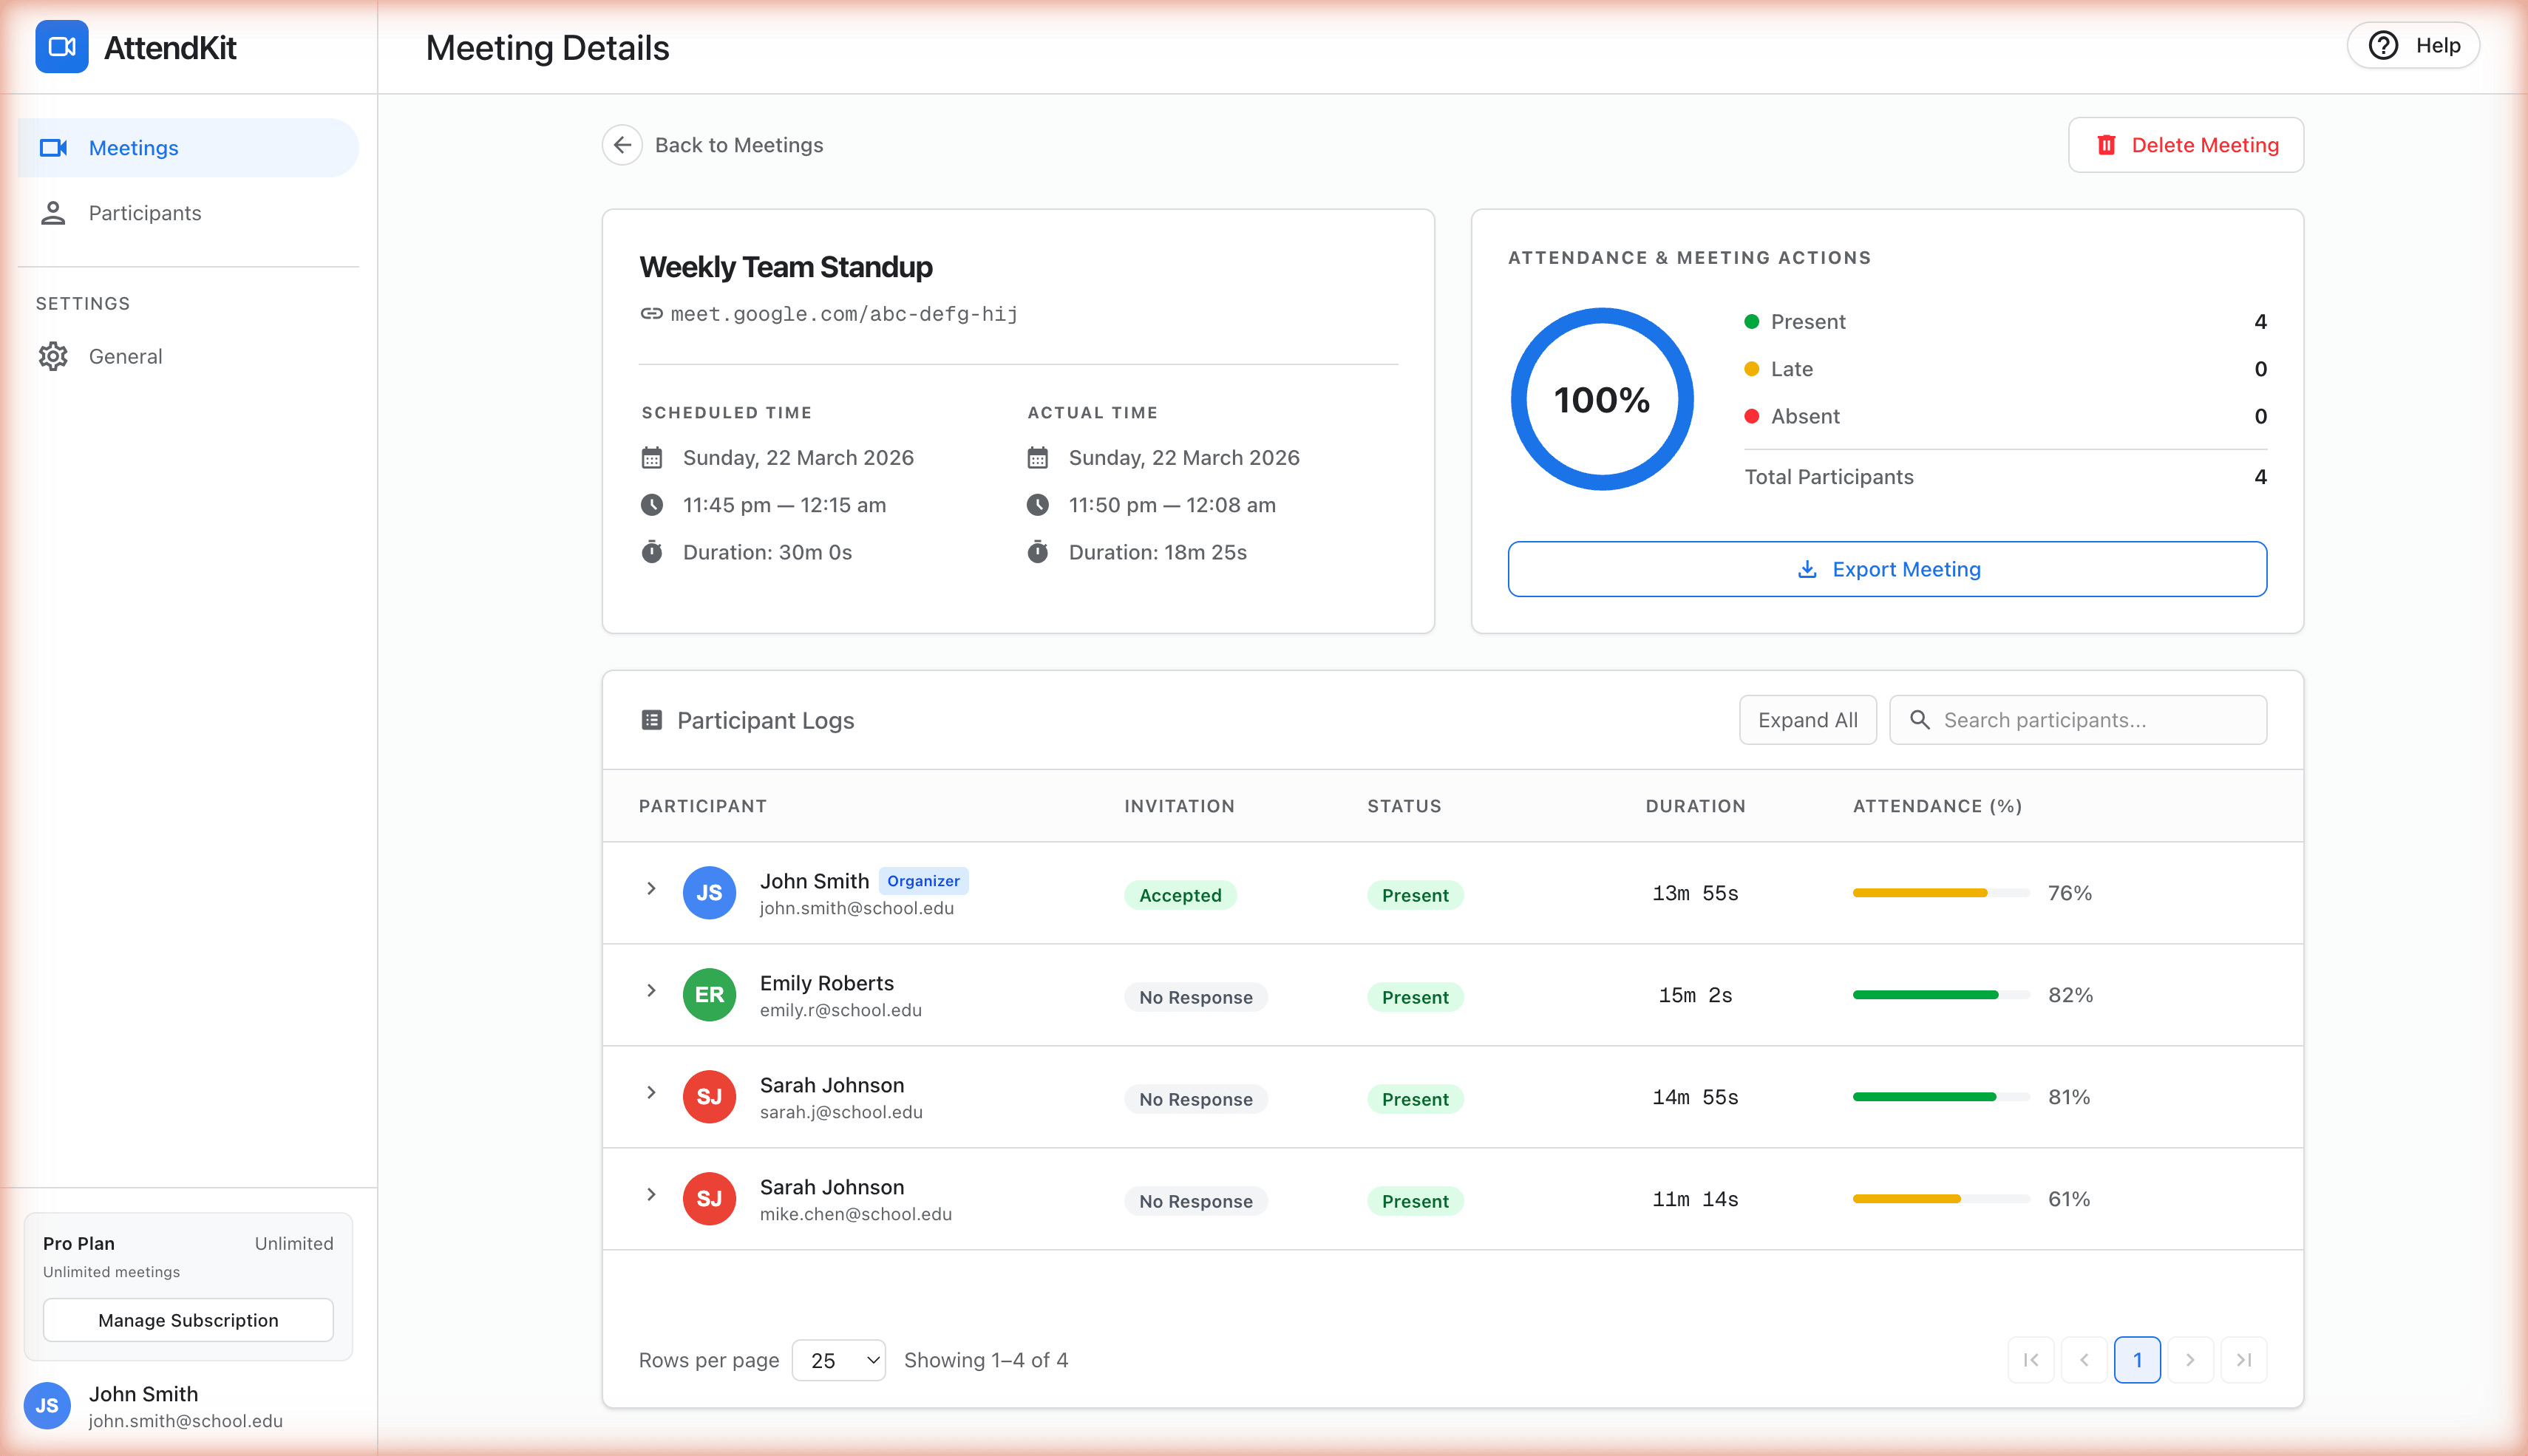
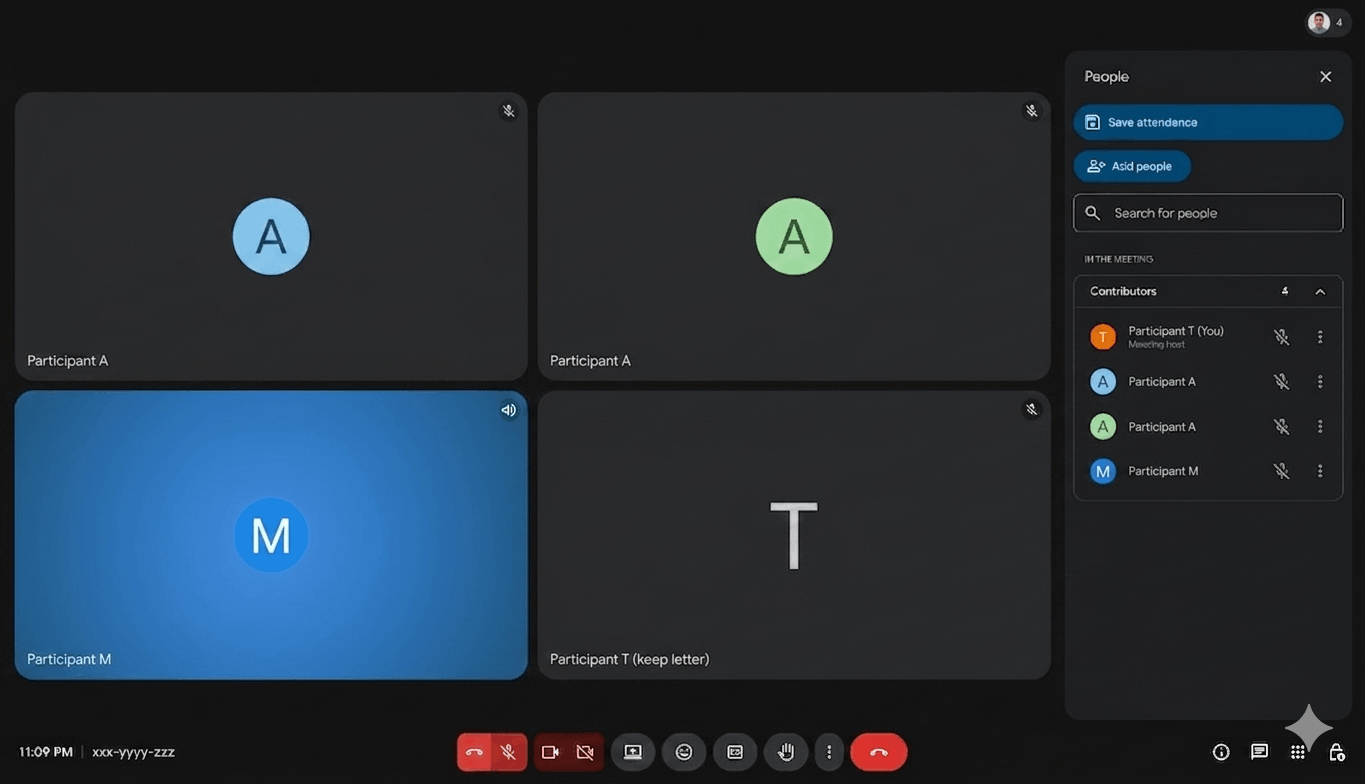
AttendKit is the option we'll walk through here because it's free up to 10 meetings per month, captures more data than Google's native tracker, and stores everything in a searchable web dashboard so you don't lose anything.
How AttendKit Works
- Install the Chrome extension from the Chrome Web Store. It takes about 20 seconds. (Or use the Workspace add-on if your organization prefers it.)
- Sign in with Google on the AttendKit dashboard. You only grant the scopes needed for Meet, Calendar and Contacts.
- Join a meeting normally. The extension detects when you join a Meet call and starts tracking participants in the background.
- View your report in the AttendKit dashboard after the call. The meeting is already there, fully enriched with calendar context, participant durations and join/leave events.

What AttendKit's Report Includes
AttendKit's reports go several layers deeper than Google's native CSV. Each meeting records every join, every leave, and every reconnect for each participant, alongside calendar context that makes the data immediately useful.
Here's what each report contains:
- Participant identity: name, email when available, profile photo from Google Contacts.
- Join and leave timestamps: every entry and exit, not just the first and last.
- Total time in call: summed across multiple sessions if the participant rejoined.
- Attendance percentage: calculated against the meeting's actual length.
- Attendance status (present, late, or absent): based on the calendar event's scheduled start time and your late threshold setting.
- Anonymous and phone-dial-in handling: these are tracked separately so signed-in attendees don't get mixed up with guests.
- Calendar enrichment: the meeting title, description, organizer, and invitee list pulled from Google Calendar. See full meeting details for more.
- Cross-meeting history: click any participant to see participant profiles with every meeting they've attended with you.
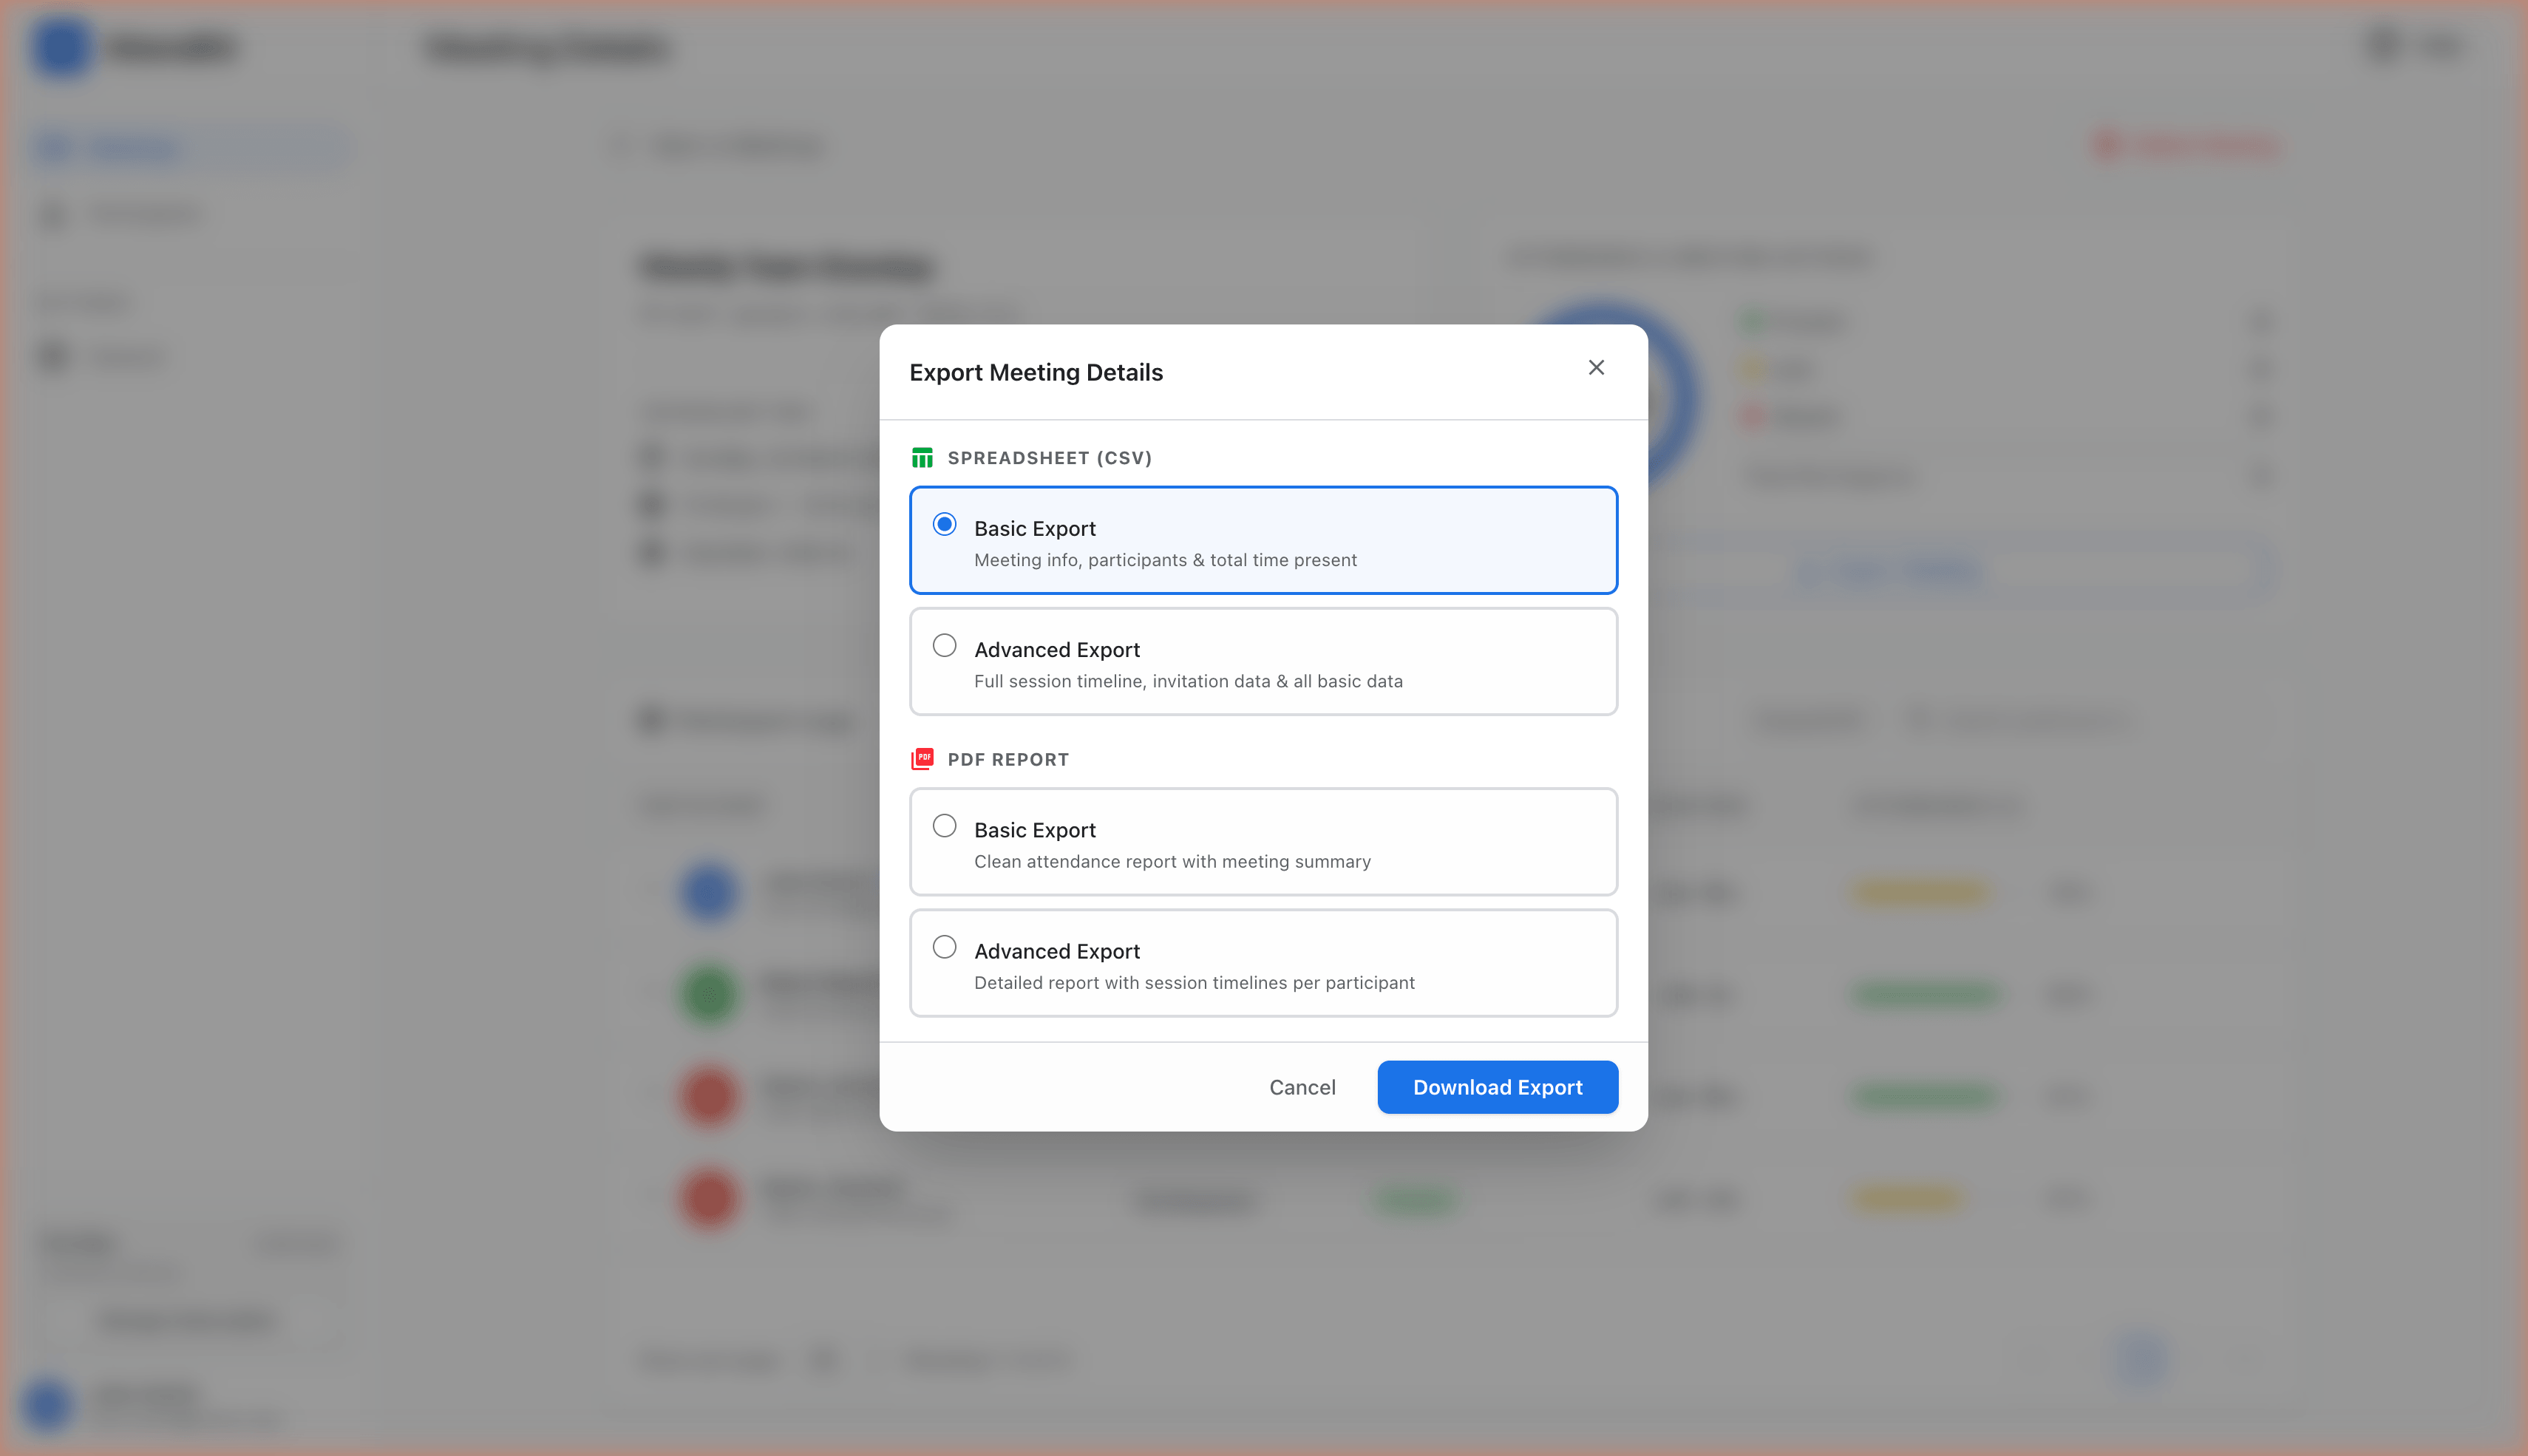
- CSV or PDF export: download a full report for any meeting in two clicks.
AttendKit Pricing
AttendKit's free tier covers 10 meetings per month, which is enough for most teachers running a couple of classes a week or a small team with a weekly standup. The Pro plan is $12.99/month or $79/year (a 49% saving on the annual plan) and includes unlimited meetings, longer history, advanced analytics, and PDF export. Configure preferences any time from Settings.
Method 3: Take Manual Screenshots
Before extensions and native tracking existed, the most common workaround was simply screenshotting the participant panel during the call. It still works and costs nothing, but it has clear limitations.
How to Do It
- Open the participant panel by clicking the People icon in the bottom right of the Meet UI.
- Take a screenshot at a few points during the meeting. Beginning, middle, and end work well.
- Scroll and capture additional screenshots if the list is long, so you cover every name.
- Transcribe the names into a spreadsheet with timestamps after the meeting.
When This Works
Screenshots are fine for one-off meetings with under a dozen participants where you only need a rough headcount. They're a reasonable last-resort option if you're a guest in a meeting (you're not the host) and you can't install software.
Why This Doesn't Scale
- You miss anyone who joins or leaves between screenshots.
- No durations. You only know who was visible at the moment of capture.
- Manual data entry is error-prone and slow.
- Anonymous guests look identical to signed-in attendees.
- For a 30-person class, you'll spend more time transcribing than teaching.
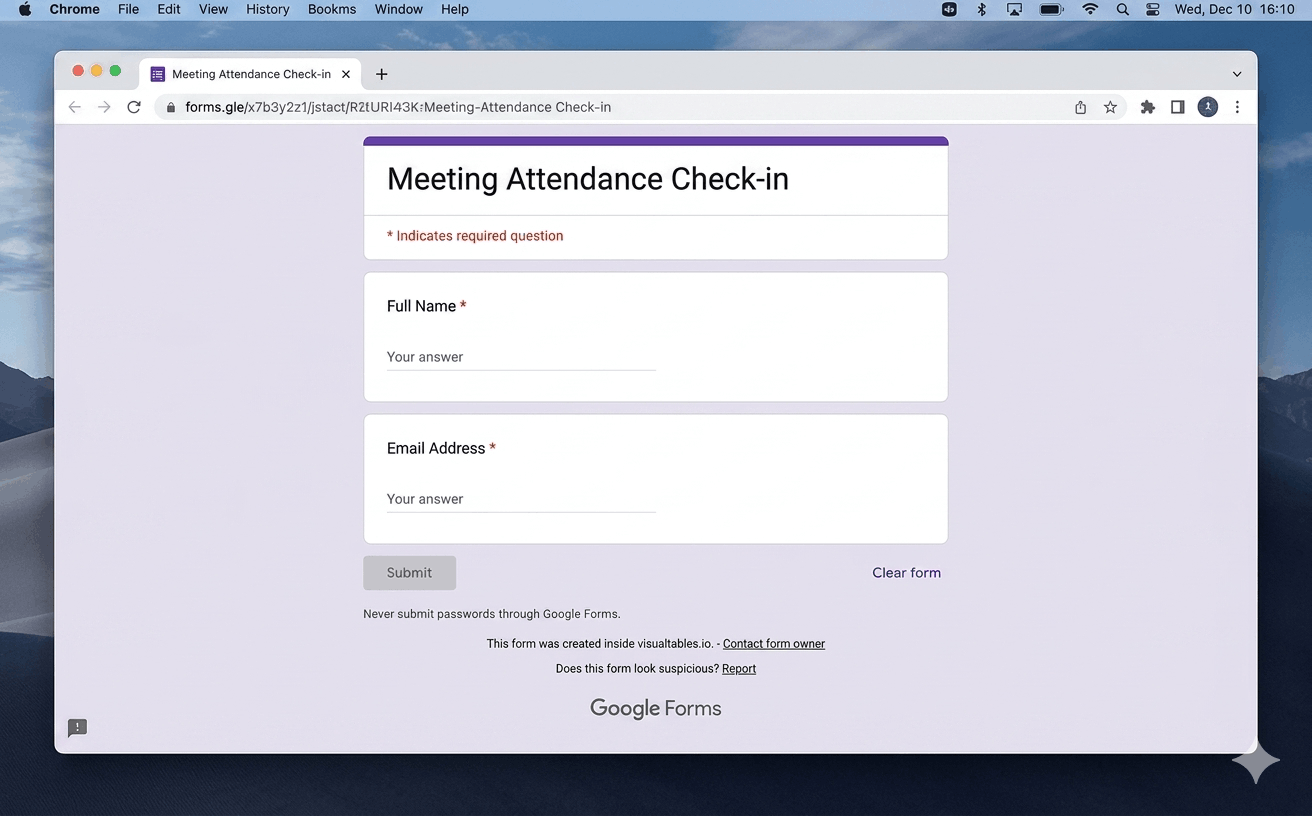
Method 4: Use a Google Form
Another no-cost approach is to ask attendees to self-report through a Google Form. You drop the form link in the chat, and Google Forms time-stamps each submission. The responses land in a Google Sheet you can sort by name or time.
How to Do It
- Create a Google Form with fields for Name, Email and any optional questions.
- Restrict the form to your domain if you want to require sign-in.
- Paste the form link into the Meet chat at the start of the meeting.
- Open the linked Google Sheet to see submissions with timestamps.
Limitations
- Self-reporting is unreliable. People forget to fill it out.
- You only capture sign-in time, not how long they stayed.
- Anyone can submit at any time, including after the meeting.
- No automatic deduplication if someone fills it out twice.
- Doesn't track late arrivals or early departures.
Comparing All 4 Methods
How to Read Your Attendance Report
Whether you use Google's native CSV or AttendKit's dashboard, the columns mean roughly the same thing. Knowing how to interpret them turns a list of names into actionable information.
Join time is the timestamp of the participant's first appearance in the meeting. If someone disconnects and rejoins, only the first join is shown in Google's native CSV. AttendKit logs every entry as a separate session.
Leave time is the timestamp of their last exit. A participant who leaves and rejoins three times will have a single "leave time" equal to the final exit. The gap between sessions is invisible in Google's report but visible in AttendKit's session timeline.
Duration is the sum of all the time the participant was actually in the call, not the difference between first join and last leave. A participant who joined for 10 minutes, left, then came back for another 15 minutes has a duration of 25 minutes, even if 90 minutes elapsed between their first join and last leave.
Attendance percentage is duration divided by total meeting length. A 50-minute call where someone was present for 40 minutes gives an 80% attendance rate. This is the most useful single number for grading or compliance.
Status (present, late, absent) is calculated against the calendar event's scheduled start. AttendKit defaults to a 5-minute grace period; anyone joining after that is flagged late.
Frequently Asked Questions
Can I get a Google Meet attendance report on a free Gmail account? Not from Google directly. Google's native attendance tracking is restricted to Business Plus and higher. To track attendance without Workspace, install a Chrome extension like AttendKit, which works on every account type.
Does Google Meet save attendance after the meeting ends? Only if attendance tracking was enabled on a supported plan. Otherwise, the participant grid disappears the moment the call ends and there's no way to retrieve it. Extensions like AttendKit save the data to a dashboard so you can pull it up weeks later.
Why is my attendance report missing some participants? Google's native CSV often omits participants who joined before the host or left before the meeting ended >30 seconds. Anonymous guests sometimes appear without a name. AttendKit captures these as "anonymous" participants with their join and leave times preserved.
Can the host see when someone leaves and rejoins? Not in Google's native report. It only shows the first join and last leave. AttendKit logs each session separately so you can see the exact timeline of joins, leaves and rejoins for every participant.
Is there a free alternative to upgrading to Business Plus? Yes. AttendKit's free tier covers 10 meetings per month at no cost and works with any Google account, including free Gmail. For high-volume use, the Pro plan at $12.99/month is dramatically cheaper than upgrading every seat in your organization to Business Plus. Curious how it stacks up against alternatives? See our roundup of the best trackers for 2026.